Monday, 12 December 2011

Wood Workshop- Trammel Box and Table construction

Back to the workshop. Today I continued with the wood workshop, working on the trammel box and table. The box for the trammel, is made out of beech, (we had a choice between beech or mahogany) and is designed to, with an extra part that will be made in the plastics workshop, to hold and display the trammel from the metal machining workshop.
Today I managed to effectively finish the box, leaving the varnish to dry over night and then I will clean it up in the morning. I am really pleased with the finish I got on the joints in the box ( a LOT of sanding down) and I am pleased that it is basically done as this leaves more time to work on the table.

The table is made out of oak, and is only a small side table, however for this we do get to design the tabletop however we like (within reason).
 Having previously cut out the joints on the correct pieces of oak (it was already cut to two sets of four lengths, one set for the legs, the other for the sides), today I was able to clean up the joints and begin it's assembly and gluing, fixing the four legs into two sides of the table. Tomorrow I will be able to connect these two parts together with the other two sides and begin work on the table top.

Below are my sketches for the table top designs. With the first page it was simply vague categories of possibilities, no true designs. But I then came up with the climbing idea on the second page to the right.
But it was rejected as being too complicated. So I went back to the sketches and, inspired by a 'cracked' table I found while researching, I decided to make the table look as if it has been shot. But to twist things up a bit I have chosen to depict the crack as if it was made of glass, as this will add to the surrealism of the design, and look more dramatic.
 The crack will be cut right through the table top but with some clever positioning and cutting, the table should be able to keep it's strength and look good, well hopefully, or it could go horribly wrong... oh well, find out tomorrow.

Friday, 9 December 2011

Cocktail Maker- Mixing Sketching and Photoshop

A couple more concepts for Graphics, to help flesh out the workbook. These are two designs where I show a couple of the quick ways I can render concepts. I started both designs with a simple pencil and pen isometric drawing.
Then I added marker rendering to the sketch adding tone and texture to help define both its colour form and material.
Then finally I used the original drawing in Photoshop to create this colour render of the the product.

The second design was done in exactly the same way as the one above. To quicken the Photoshop stage I used my graphics tablet as I am quicker and more comfortable with it than with either the mouse of touchpad.

Wednesday, 7 December 2011

A World of Drink

Here is another graphic I have made for my graphics project. I am designing a cocktail maker, and as a part of the research I have been looking up the origins of various drinks and cocktails. During which I came to the interesting realisation that alcoholic drinks are one of the few discoveries/inventions that have been created worldwide by independent cultures. As such I decided to make this graphic to help demonstrate this fact.
I started off with some various items related to making cocktails, getting images of them and creating silhouettes of them. The images I used are below.

I then imported them into an image of a map of the world to create the image below.

However I did not like how it came out it appeared too cluttered and a mix to too many varied shapes. As such I decided to remake it using only the images below.

From these I made this image which I will use in my workbook. I will annotate it in illustrator, as it is a better text editor.

Monday, 5 December 2011

Wood Workshop- H

Today was the start of the wood workshop and I learnt of the three objects I would be making over the course of the next two weeks up to the Christmas Holidays. I must admit that wood is one of my least favourite of the main materials (wood, plastic metal, fabric) to work with, due to it's unpredictable nature, and its tendency to distort of be damaged in some way (splinters, dents, warping, swelling, grain, splitting etc.) however I cannot deny it's aesthetic properties. So it is with some apprehension that I approach this workshop, but hopefully all will go smoothly.
The three objects I will be making are a construct combining two joints, a box for the trammel I made here, and a small table. The first two must be made to description, however the table will be my own design based on a basic template.

We began with the joint construct, which is a H shape (above), made in Pine, which uses a Lap joint at one end and a Mortise and Tenon at the other. It also features a champfer along the inside edges. The aim of this is to understand the properties of the material and get used to working with it, the challenge is that it is made entirely by hand tool, no machines. Over the day I have made good progress and am nearly finished with this, I have only to clean up the champfer and faces and I will be done (it is not being glued). Tomorrow I will start on the Table and Box. Here are some pictures of the construct.
 Making the piece above involved a number of new tools for me including the clamp below, which is inserted into a hole in the workbench and allows a greater freedom than simple G clamps.

Sunday, 4 December 2011

Hidden Heroes and a Giant Reindeer

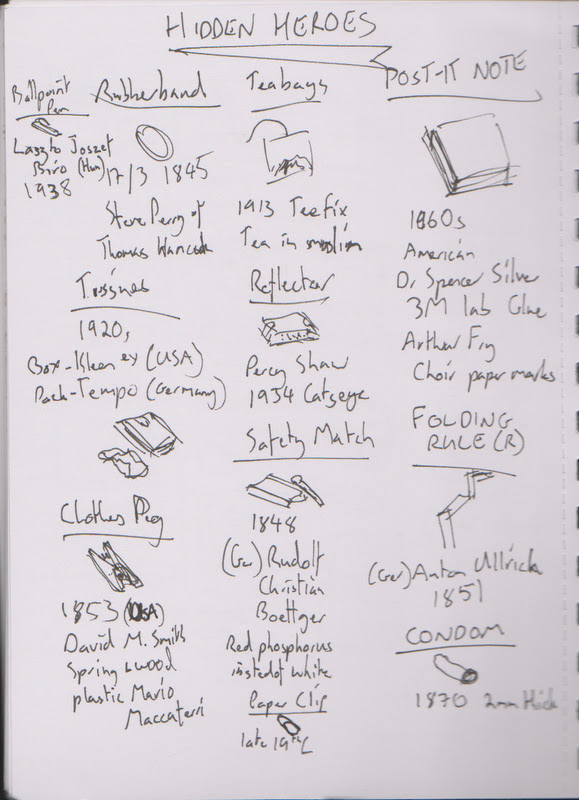
 Today I had a trip into London, I went for a couple of reasons as I will show below, and I had a very interesting time. Visiting London will always be a fun experience, and as I am so close I intend to take advantage of that over the next few years. First I visited the Science Museum, where I had intended to see an exhibition on the integration of Robots into daily lives. But it was fully booked and today was the last day. However....

I did find another exhibition that was interesting and more relevant to my course. The exhibition is called Hidden Heroes, and tells of the invention and development of a number of overlooked items in today's society. Some example were: Rubber bands, Ballpoint pens, Teabags, Post-it Notes, Tissues, Safety Matches,  Paper Clips, Condoms, Clothes Hangers, Drinks Cartons, Bubble Wrap, Pencils, Sticky Tape, Wall Plugs, Lego and Bar codes. Photos were prohibited, so I made sketches and notes on each object.

It was a very interesting display and showed the remarkable amount of effort that had gone into developing some of the objects. So a day redeemed. I also had a look round at the museums other exhibits, before doing some shopping at the London Graphic Centre and Magma shops.

I must say however the most surprising thing of the day was this found at Covent Garden:
It was also the most disappointing as it was fake, oh well.

Saturday, 3 December 2011

Cocktail Research- Ingredients & Infographics

I've been doing some research on Cocktail Recipes for my graphics project, which has been enlightening and amusing to say the least. But now that it is done, I have collected the information into a more visual and graphical style: Infographics. Infographics are visual ways to display often complex information in a much clearer and easy to understand medium than just text.

My first Infographic was to collect all the recipes I had gathered and demonstrate how the various ingredients are used multiple times in different combinations in different drinks.

 The names of the drinks go on the left while the ingredients are along the top. Each new colour is a different ingredient.
With this done I then decided to display the information in a different way, as a series of linked boxes, with the drink is linked to their component ingedients.However this did not work.
So I decided to minimise the clutter by minimising the ingredients, and thus the drinks.
Now it is much clearer and shows how 9 ingredients can be used to create 16 different drinks. I was reduced to only nine by limitations of both space, and in what combinations I could link without the lines crossing. But anyway, I'm pleased with my first proper Infographics and I plan on doing many more.

Friday, 2 December 2011

Cocktail Maker- Photoshop Sketches

Some more sketches for the Cocktail Maker. These however are done quickly in photoshop, to create a more realistic and striking visual impact. They are can give a better understanding of the materials involved in the construction and the colours.