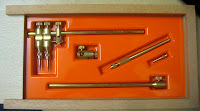
Last we saw the trammel box it was finished but looked somewhat like this. So now it is fully constructed and finished. I chose to varnish it and not polish it as I prefer the satin look to the glossy look from the polish.
The lid on the top, made of veneered MDF, slides open to the left to reveal...
The Trammel inside. The orange tray is simply some HIPS vacuum formed around a premade mould to hold the trammel in it's various parts. I chose orange, partly because it was between that, red or yellow, but also because it compliments the gold of the brass and the paleness of the beech. I may change it when I get round to the plastic workshop, as it isn't cut perfectly and I will have a greater choice of colour, but for now it is fine. I am particularly glad this is made as I now have a place to store the trammel, which was just sitting on my shelf.
Of course the other piece I made in the workshop was the coffee table. Last time the table was still in two pieces with the legs gluing in pairs but the two pairs of legs were glued together with the remaining two side pieces.
That done I began work on my table top. I you remember the top was designed as such with a bullet like hole in the top. I have suck with this idea. However because I had more time that I reasoned it would take to create the hole, I decided to first create a basic inlay in the form of the border of Mahogany.
This proved to be anything but simple, but in the end I got it done to a quality I was happy with. I then consulted with one of the technicians on how best to create the crack, and we decide that I should first use a Forsner bit to create the hole and then use a large Heckler saw to cut out the cracks. However another technician, while being asked about the plausibility of making the cuts, kindly agreed to cut it himself, as the thick oak would need an experienced and very steady hand to guide the wood. So the next morning I collected my perfectly cut wood, and set about sanding it down, using a Bobbin Sander to create the jagged edges of the hole and then painted the inside in black paint before varnishing it.
Once it was dry and the legs were dry as well, I used some screws to fix the top in place finishing off the table, and with only 10minutes before the deadline just in time too.
I am really pleased with how it has come out and now that I have had my last lecture of 2011, I can take it home with me tomorrow! So just a quick thanks for all of you who have stoically endured this through my first term at Brunel and I'll be back at Brunel in January, but even though it is now the holidays I still have a lot of work to do so I will keep posting, though I may take a break for Christmas:)


No comments:
Post a Comment