Showing posts with label Metal. Show all posts

Friday, 27 April 2012

Metal Fabrication Workshop- Incense Burner Construction

So this is the last of my Brunel Workshops for this year; metal fabrication.

So we started off being given our set amount of metal. the metal we are using is called guilding metal, which is a copper(95%) and zinc(5%) alloy. We then set about learning about the workshop and the various machines.
With the tour done done we were taught how to solder the metal together and were each given a go at it ourselves as we would be doing this for our work later. The soldering was very similar to the brazing work I had done earlier (see this chair). When the joint was made we were encouraged to try and destroy it which if you had done it right you couldn't.
So back to work and the first job was to creat the impression of the oil bowl (try saying that fast 20 times without saying boil) using a large pressing machine.
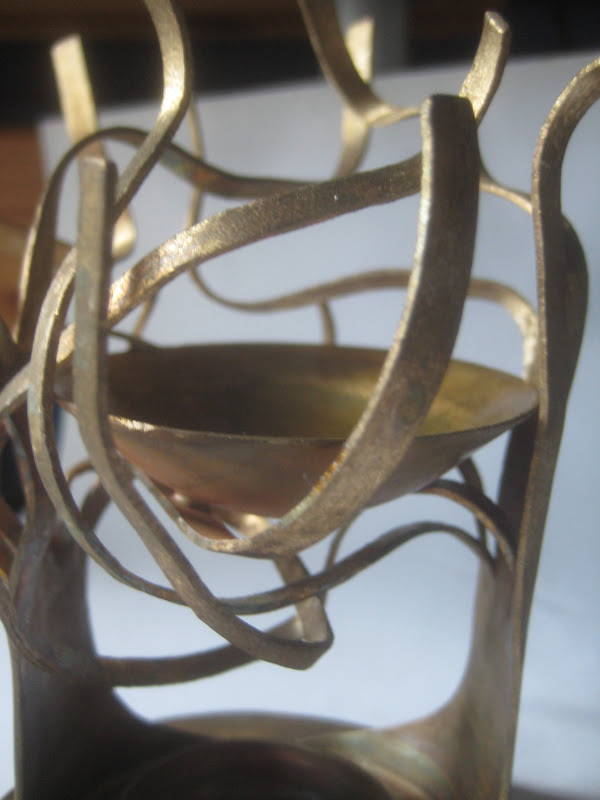
 That done I then began cutting out the parts to my design on the band saw, two long tall pieces with one splayed end each and mm spaced cuts down most of the length and a round flat base. These two pieces I then hit repeadly with a hammer (an actual technique!) to give them an interesting texture. This process did however result in work hardening so to remove this the round piece was annealed by heating it up till it went red to soften it.
The tall side pieces were then put through a metal wringer to curve them, along with the piece that was then soldered to form the part that will hold the tea light.
 I then soldered the side pieces and the tea light bit to the base, in their correct positions,
 I then began to splay out and model the cut ends of the side pieces into, well a large natural looking tangle. My idea was to replicate the sort of natural feel of both trees and the flames/smoke of fire.
When that was done I took the oil bowl, now cut out and cleaned up and soldered that in place amongst the tangle of metal. This was quite tricky as when applying the heat, if it stayed in one point, would easily melt through the metal, so I had to watch the flame very carefully.
Once cool it was submerged in an acid bath over night to remove any dirt and discolouration from the soldering and any small rough bits from the cutting. When it was out of the bath I set to work with a dremmel sanding away any rough or sharp edges and any left over discolouration.
 The aim of the workshop was to create a highly polished and reflective finish, but with the complexity of my design both me and the technician agreed that was impossible in the alloted time for me. So I got it to as high a standard as I colud in the time.
Overall I am pleased with how it has come out and have put it through a couple of test runs already where the shadows from the....branches(?)....create intesting shapes around it and it works well. So that was the last of the five very enjoyable and satisfying workshops of my first year at Brunel.

Thursday, 26 April 2012

Metal Fabrication Workshop- Incense Burner Designs

So first my apologies there hasn't been a new post in a month now. In my defence I have been quite busy so there is lots of new material for more posts.


So for my last workshop the aim is to make an Incense Burner out of a brass like copper alloy. We have been told that we are limited in the amount of material we can use to a 100mm2 piece for the oil to sit in and a 200mm2 piece for the rest. With that in mind here are some of the designs I came up with for that brief.
The final design I have chosen to go with is this one below. My aim is to imitate the wavy lines of smoke that come up from burning incense in metal that will support the bowl.
To help me visualise it I attempted a paper model
The model kind of conveys the idea but not particularly well so you'll have to wait to see what it really will look like.

Sunday, 19 February 2012

Mechanics Tensile Lab Test

This week I had to hand in a Laboratory Report. The lab was on material tensile strength, looking at the stress/strain graphs exhibited by different grades (Carbon percentage) of mild steel. The machine we used was a Hounsfield Tensometer.
A part of the report was to describe and explain the equipment used in the experiment. To accompany the text I wanted some images, but I was unable to find images that represented the equipment with any sort of cohesion. To solve this I decided to take the best images I could find, whether sketches, technical diagrams or a couple of photos taken by me, and use Illustrator to create some simple vector outlines.


These show the different equipment used from the top, the Hounsfield Tensometer, the samples used, a Tinsley Strain Measurement Bridge, Ultimate Area Reduction Gauge and Ultimate Elongation Gauge.
Below are a couple of pictures I took of the experiment at the time, they weren't too good but I did use the one on the right for the Bridge.
Finally a couple of graphs from the results of the experiments. The one on the left shows the stress/strain curves of 0.1%, 0.2%, 0.4% and 0.8% Carbon Steel, while the one on the right is the Elongation, Yield Strength and Ultimate Tensile Strength against the increasing Carbon %.

Sunday, 20 November 2011

Metal Workshop- Trammel (5) Complete

My first workshop is now finished, and about time too. Above is the completed trammel which was finished on Wednesday, marked on Thursday and I picked up on Friday. Hopefully I got a good score as I finished on time and managed to get a reasonably good finish and degree of accuracy into the tool. It has been fun making it and as a first time making something of this nature, it feels good to know that I have made something that I would not be surprised to find in a shop, due to the accuracy of the machines I was using. And because you probably know all there is to (or would want to) know about this, I'll just leave you with some pictures of the final object.
The Trammel in it's various components.
The main body of the trammel
 The trammel pen and lead holder and the extension

And some close ups of the trammel

And finally, my stamp of ownership, on both of the two point holders.
So that's the end of that part of my course, hopefully passing the workshop so I can be deemed safe to use it next year, and now another break for two weeks for graphics before the wood working workshop for two weeks before Christmas. (p.s I've only just found out it's a 'Trammel')

Tuesday, 15 November 2011

Metal Workshop- Tremmel (4)

A quick update of my process at the moment with the tremmel, with half a day to go till it is marked, and progress is good.
The main body of the tremmel
With the extension above it.
Some closeups of the completed components in place.

My initials stamped onto the side of the pin holders.
And finally some extras, on the left is the first part of a components to hold a lead, the right is a pen/pencil extension to the tremmel however because I made a slight mistake, it is now also optimized for holding a scalpel as well. So anyway, the final making day is tomorrow, and all looks well.

Monday, 14 November 2011

Metal Workshop- Tremmel (3) and a pencil......pen.......thing

Sorry but more work on the tremmel today. I finished my preliminary work on the lathe, more to be done later though, and started work on the milling machines

The milling machines are the linear response to the rotation of the lathe, namely a way to make precise and automated vertical and horizontal cuts and holes, and as such I was able to add the required holes to the extension adjustment component. This was all I was able to do as the milling machine is very confusing and has some very complicated processes using strange things such as wobblers, datums, reamers, digital readouts and leather hammers (called hammers of Thor), at least complicated to all of us beginners.
 The milling machine

 
 However, while waiting for a chance to use the milling machine, there are only six in the workshop, I was given a bonus challenge on the lathe in the form of a tremmel style pencil/pen.
 The pencil is made from two parts of the same 8mm rod, and uses the techniques we have used already, but to a greater extent.
 I was also given an option of how I wanted the end of the pencil finished, choosing an angled end. I do still need to finish and polish it, but that can be done in the general polishing session that will inevitably come later. So more work tomorrow and more greasy hands, what fun.