
Showing posts with label Wood. Show all posts
Showing posts with label Wood. Show all posts
Friday, 18 May 2012
Singapore Experience Design- Final Design Sketch
This is a render of the final design for the Singapore Migrant Worker Accommodation project.
 It has two stories, and is made of a wood called Glulam, which is made of the bits of wood that are normally discarded. It would be modular, this is just one unit but they could be stacked into tower blocks. It would be placed on or near to the work site but the construction company.

Saturday, 24 March 2012
Rig Building
So its a couple of weeks old, but this is the time lapse video from the Rig Building day I recently did as part of a team for our experience project. The brief of the project, given to us by our first outside clients the charity Building Trust International, is to create accommodation for 8 migrant workers living in Singapore in a 20m2 and 4m high area. as part of answering this brief we built a full size model of one of the components for the design. This was to check the dimensions and possibility of someone sleeping in this component, or 'pod'. Below is a time lapse video I took through out the day showing both the construction and dismantling of the rig.
From the rig, we found that our dimensions were good, if anything too generous so this allowed us to slightly change our design for the better use of the available space. Here are also some pictures taken during the process.


From the rig, we found that our dimensions were good, if anything too generous so this allowed us to slightly change our design for the better use of the available space. Here are also some pictures taken during the process.


Friday, 16 December 2011
Wood Workshop- Finished
So the wood workshop is now finished and I have a lovely table, box for my trammel and a pair of joints (not pictured).
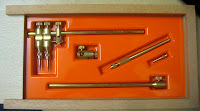
 Last we saw the trammel box it was finished but looked somewhat like this. So now it is fully constructed and finished. I chose to varnish it and not polish it as I prefer the satin look to the glossy look from the polish.




The lid on the top, made of veneered MDF, slides open to the left to reveal...


The Trammel inside. The orange tray is simply some HIPS vacuum formed around a premade mould to hold the trammel in it's various parts. I chose orange, partly because it was between that, red or yellow, but also because it compliments the gold of the brass and the paleness of the beech. I may change it when I get round to the plastic workshop, as it isn't cut perfectly and I will have a greater choice of colour, but for now it is fine. I am particularly glad this is made as I now have a place to store the trammel, which was just sitting on my shelf.
Of course the other piece I made in the workshop was the coffee table. Last time the table was still in two pieces with the legs gluing in pairs but the two pairs of legs were glued together with the remaining two side pieces.


That done I began work on my table top. I you remember the top was designed as such with a bullet like hole in the top. I have suck with this idea. However because I had more time that I reasoned it would take to create the hole, I decided to first create a basic inlay in the form of the border of Mahogany.


This proved to be anything but simple, but in the end I got it done to a quality I was happy with. I then consulted with one of the technicians on how best to create the crack, and we decide that I should first use a Forsner bit to create the hole and then use a large Heckler saw to cut out the cracks. However another technician, while being asked about the plausibility of making the cuts, kindly agreed to cut it himself, as the thick oak would need an experienced and very steady hand to guide the wood. So the next morning I collected my perfectly cut wood, and set about sanding it down, using a Bobbin Sander to create the jagged edges of the hole and then painted the inside in black paint before varnishing it.

Once it was dry and the legs were dry as well, I used some screws to fix the top in place finishing off the table, and with only 10minutes before the deadline just in time too.
I am really pleased with how it has come out and now that I have had my last lecture of 2011, I can take it home with me tomorrow! So just a quick thanks for all of you who have stoically endured this through my first term at Brunel and I'll be back at Brunel in January, but even though it is now the holidays I still have a lot of work to do so I will keep posting, though I may take a break for Christmas:)
Monday, 12 December 2011
Wood Workshop- Trammel Box and Table construction
Back to the workshop. Today I continued with the wood workshop, working on the trammel box and table. The box for the trammel, is made out of beech, (we had a choice between beech or mahogany) and is designed to, with an extra part that will be made in the plastics workshop, to hold and display the trammel from the metal machining workshop.
 Today I managed to effectively finish the box, leaving the varnish to dry over night and then I will clean it up in the morning. I am really pleased with the finish I got on the joints in the box ( a LOT of sanding down) and I am pleased that it is basically done as this leaves more time to work on the table.
The table is made out of oak, and is only a small side table, however for this we do get to design the tabletop however we like (within reason).
 Having previously cut out the joints on the correct pieces of oak (it was already cut to two sets of four lengths, one set for the legs, the other for the sides), today I was able to clean up the joints and begin it's assembly and gluing, fixing the four legs into two sides of the table. Tomorrow I will be able to connect these two parts together with the other two sides and begin work on the table top.
Below are my sketches for the table top designs. With the first page it was simply vague categories of possibilities, no true designs. But I then came up with the climbing idea on the second page to the right.


 The crack will be cut right through the table top but with some clever positioning and cutting, the table should be able to keep it's strength and look good, well hopefully, or it could go horribly wrong... oh well, find out tomorrow.

The table is made out of oak, and is only a small side table, however for this we do get to design the tabletop however we like (within reason).


But it was rejected as being too complicated. So I went back to the sketches and, inspired by a 'cracked' table I found while researching, I decided to make the table look as if it has been shot. But to twist things up a bit I have chosen to depict the crack as if it was made of glass, as this will add to the surrealism of the design, and look more dramatic.

Monday, 5 December 2011
Wood Workshop- H
Today was the start of the wood workshop and I learnt of the three objects I would be making over the course of the next two weeks up to the Christmas Holidays. I must admit that wood is one of my least favourite of the main materials (wood, plastic metal, fabric) to work with, due to it's unpredictable nature, and its tendency to distort of be damaged in some way (splinters, dents, warping, swelling, grain, splitting etc.) however I cannot deny it's aesthetic properties. So it is with some apprehension that I approach this workshop, but hopefully all will go smoothly.
 The three objects I will be making are a construct combining two joints, a box for the trammel I made here, and a small table. The first two must be made to description, however the table will be my own design based on a basic template.
We began with the joint construct, which is a H shape (above), made in Pine, which uses a Lap joint at one end and a Mortise and Tenon at the other. It also features a champfer along the inside edges. The aim of this is to understand the properties of the material and get used to working with it, the challenge is that it is made entirely by hand tool, no machines. Over the day I have made good progress and am nearly finished with this, I have only to clean up the champfer and faces and I will be done (it is not being glued). Tomorrow I will start on the Table and Box. Here are some pictures of the construct.


 Making the piece above involved a number of new tools for me including the clamp below, which is inserted into a hole in the workbench and allows a greater freedom than simple G clamps.


We began with the joint construct, which is a H shape (above), made in Pine, which uses a Lap joint at one end and a Mortise and Tenon at the other. It also features a champfer along the inside edges. The aim of this is to understand the properties of the material and get used to working with it, the challenge is that it is made entirely by hand tool, no machines. Over the day I have made good progress and am nearly finished with this, I have only to clean up the champfer and faces and I will be done (it is not being glued). Tomorrow I will start on the Table and Box. Here are some pictures of the construct.


Subscribe to:
Posts (Atom)