Sunday, 4 December 2011

Hidden Heroes and a Giant Reindeer

 Today I had a trip into London, I went for a couple of reasons as I will show below, and I had a very interesting time. Visiting London will always be a fun experience, and as I am so close I intend to take advantage of that over the next few years. First I visited the Science Museum, where I had intended to see an exhibition on the integration of Robots into daily lives. But it was fully booked and today was the last day. However....

I did find another exhibition that was interesting and more relevant to my course. The exhibition is called Hidden Heroes, and tells of the invention and development of a number of overlooked items in today's society. Some example were: Rubber bands, Ballpoint pens, Teabags, Post-it Notes, Tissues, Safety Matches,  Paper Clips, Condoms, Clothes Hangers, Drinks Cartons, Bubble Wrap, Pencils, Sticky Tape, Wall Plugs, Lego and Bar codes. Photos were prohibited, so I made sketches and notes on each object.

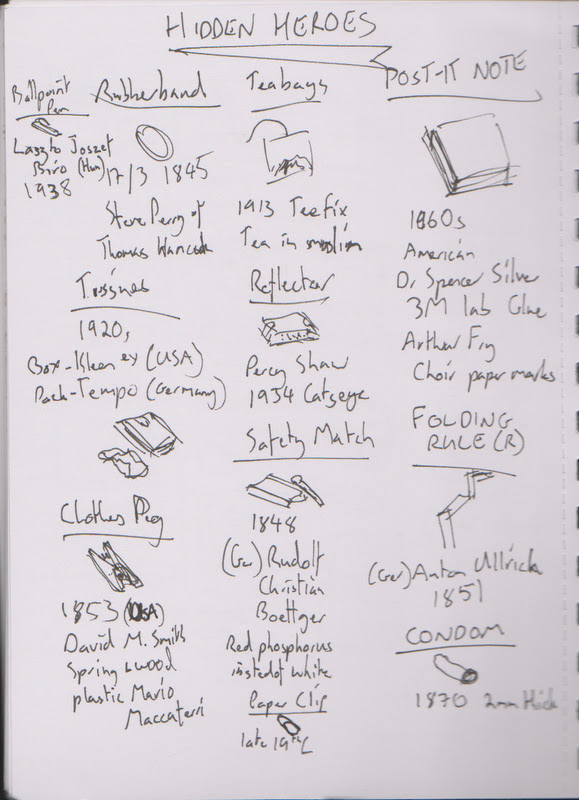
It was a very interesting display and showed the remarkable amount of effort that had gone into developing some of the objects. So a day redeemed. I also had a look round at the museums other exhibits, before doing some shopping at the London Graphic Centre and Magma shops.

I must say however the most surprising thing of the day was this found at Covent Garden:
It was also the most disappointing as it was fake, oh well.

Saturday, 3 December 2011

Cocktail Research- Ingredients & Infographics

I've been doing some research on Cocktail Recipes for my graphics project, which has been enlightening and amusing to say the least. But now that it is done, I have collected the information into a more visual and graphical style: Infographics. Infographics are visual ways to display often complex information in a much clearer and easy to understand medium than just text.

My first Infographic was to collect all the recipes I had gathered and demonstrate how the various ingredients are used multiple times in different combinations in different drinks.

 The names of the drinks go on the left while the ingredients are along the top. Each new colour is a different ingredient.
With this done I then decided to display the information in a different way, as a series of linked boxes, with the drink is linked to their component ingedients.However this did not work.
So I decided to minimise the clutter by minimising the ingredients, and thus the drinks.
Now it is much clearer and shows how 9 ingredients can be used to create 16 different drinks. I was reduced to only nine by limitations of both space, and in what combinations I could link without the lines crossing. But anyway, I'm pleased with my first proper Infographics and I plan on doing many more.

Friday, 2 December 2011

Cocktail Maker- Photoshop Sketches

Some more sketches for the Cocktail Maker. These however are done quickly in photoshop, to create a more realistic and striking visual impact. They are can give a better understanding of the materials involved in the construction and the colours.

Wednesday, 30 November 2011

Cocktail Maker

Sorry I haven't posted in a while but I'm back on track now so....
For my graphics project I am making an automatic Cocktail Maker. It will be made in Photoshop and presented as a poster and workbook. Below are some initial ideas for the design in ink.
 The next few designs are just in the marker pens are are supposed to be only vague ideas.

Thursday, 24 November 2011

Little Book of Life

For Christmas last year, one of the things I received was a small sketching Moleskine. Now for me I consider this Moleskine something to be filled with ideas and notes that can be used and referred to long after it's pages are full. As such I have delayed using it as I have been unsure of what to fill it with. Until now. (sorry)
My plan now for this is that it shall be a little compendium or encyclopedia of all the interesting things I learn while at University (and beyond) that are not directly a part of my course. This came about while watching an episode of James May's Man Lab, when I realised that all this information I was being fed would most likely be forgotten by the next day so I resolved to document it in this which I can carry with me wherever. It will be my little book of Thoughts, Theories, Facts, Folklore and Funnies(?). Below are a few spreads from it so far.

So far I have quotes from:
      • Ian Flemming
      • Sir George Mallory (1st to climb Everest)
      • George R.R. Martin
      • Dieter Rams
      • Rowan Atkinson
      • Leonardo Da Vinci
      • Winston Churchill
      • Dr Seuss
      • Stephen Fry
      • David Attenborough
And I hope to gain many more and record them, not to be forgotten.

Wednesday, 23 November 2011

Sci-Fi Space Ship

Today I had a free day and other than meeting a friend from school whi had come up for an interview, nothing really happened, so lots of work then...well not really. Today I basically had, as far as the work had to go, a creative block. I was still able to get some maths and electronics done, so not a day wasted, but not a great day either. So in an attempt to get some creativity back into me I decided to do something I have not done in a while and embrace creativity wholely, abandoning reality. To make something completely imaginative.
So this is the resulting design (please click for a larger view it looks much better), a sci-fi sort space ship/plane. I chose to do it following the advice of the artist Doug Chiang, an exceptional concept designer whose book Mechanika I own. Doug Chiang is a multi award winning designer (2 BAFTAs and an Oscar) who has designed for movies such as Star Wars Episode I (as lead designer), Episode II, War of the Worlds, Terminator 2 and Forrest Gump. I would recommned his book Mechanika to any designer as it features excellent tips on using markers and photoshop and creating good design.

Sunday, 20 November 2011

Metal Workshop- Trammel (5) Complete

My first workshop is now finished, and about time too. Above is the completed trammel which was finished on Wednesday, marked on Thursday and I picked up on Friday. Hopefully I got a good score as I finished on time and managed to get a reasonably good finish and degree of accuracy into the tool. It has been fun making it and as a first time making something of this nature, it feels good to know that I have made something that I would not be surprised to find in a shop, due to the accuracy of the machines I was using. And because you probably know all there is to (or would want to) know about this, I'll just leave you with some pictures of the final object.
The Trammel in it's various components.
The main body of the trammel
 The trammel pen and lead holder and the extension

And some close ups of the trammel

And finally, my stamp of ownership, on both of the two point holders.
So that's the end of that part of my course, hopefully passing the workshop so I can be deemed safe to use it next year, and now another break for two weeks for graphics before the wood working workshop for two weeks before Christmas. (p.s I've only just found out it's a 'Trammel')